Friday, December 30, 2011

Kirsikkakangasta!
Pöytäliina

Pöytäliina – H&M:stä

http://www.hm.com/fi/s/02FWDS

Pöytäliina painokuvioitua puuvillamateriaalia. Koko 145x250 cm.

Saturday, December 24, 2011

Santa Baby...

Olen ilmeisesti ollut tänä vuonna tosi kiltti, ja lisäksi päätellyt asian olevan näin jo hyvissä ajoin. Löysin itse itselleni syyskuussa ostamani joululahjan siivotessani kirjahyllyä. Oi ihanaa! Olin ehtinyt jo unohtaa koko kirjan.


Kirjailu ei oikein koskaan ole ollut se "mun juttu". Ei sillä ettenkö olisi testaillut tekniikoita aina joskus, mutta jotenkin se viimeinen sysäys on jäänyt puuttumaan. Tässä kirjassa on kuitenkin sellaisia ideoita jotka saattavat saada innon lopullisesti syttymään...

Hauskaa Joulua!

--
Embroidery has never been exactly my cup of tea for some reason. But with the designs featured in this book, it just might be the next big thing for me.

Merry Christmas!

Sunday, December 11, 2011

Moni paketti päältä kaunis - Crafty ideas for wrapping Christmas presents

I sometimes use knitting yarn left overs to decorate presents. I used simple chain stitch to this one.


I've printed my favorite Christmas carols to decorate plain packing paper wrapped presents. I think brown paper looks cool with red silk ribbon.

I drew the reindeer and reindeer steps in the snow directly to the paper after wrapping. You can see the details by clicking the photo bigger.

Poro ja jalanjäljet on piirretty pakettipaperiin tussilla. Alemmassa paketissa paperinarua, päälimmäisessä silkkinauhaa. Päälimmäisen paketin nauhan alla on joululaulun sanat.
Lahjanarun sijaan voi käyttää villalangasta virkattua ketjusilmukkanauhaa.

Thursday, December 8, 2011

Party pumps

Take your ordinary black pumps to the next level by adding some decorations to them.


I used leather ribbon and black satin rose to give my black pumps a rock'n'roll twist. First I glued the ribbon into a bow and then glued the rose on top. When they were dry I glued them in place with a glue gun. If you don't want the decorations to be permanent you can use a clip on earring base for the bow.

Suomeksi: Tavalliset mustat korkokengät muuntuvat pikkujouluhenkisiksi ja vähän rokahtaviksi värillisestä nahkanauhasta taitetulla rusetilla. Rusetin päällä koristeena musta silkkiruusu. Kiinnitin koko systeemin kenkään kuumaliimalla.

Wednesday, November 16, 2011

Drinks and dresses

I just love ModCloth! Even if I'm not buying anything I just love to browse the site for inspiration. Like this Drinks On Me Dress. It's got the cutest midcentury style print with drinks all over. And if you didin't notice, it's yellow! Just perfect for those hot!hot!hot! summer days.


The price is way out of my budget though. ;)

So, I decided to find a fabric that would have similar "feeling" and just do it myself. Browsing eBay I found this Flirty Fifties Martini fabric:

I used an early 1960's pattern and came up with this:


A nice addition to my summer wardrobe... though it's almost winter now. ;)

Sunday, October 16, 2011


Vintage style party hair in 10 minutes - Vintage-kampaus 10 minuutissa

Joskus on ihanaa istua koko lauantai rullat päässä ja valmistautua illan rientoihin, mutta yhä useammin (varsinkin reissatessa) joutuu turvautumaan nk. "pikanutturaan", jonka saa kyhättyä kokoon tarpeen vaatiessa alle 10 minuutissa.
Tässä pikanutturan salaisuus:


1. Tee ponnari
2. Tupeeraa hiukset kammalla reilusti, jätä päälimmäiset hiukset suoriksi
3. Taita ponnari ylös ja kiinnitä pinneillä . Asettele pinnit limittäin vaakasuuntaan n. 10 cm leveydelle
4. Taita ponnari varovasti takaisin alas ja siloita pinta kammalla
5. Taivuta latvat ponnarin alle ja kiinnitä pinneillä samaan tapaan kuin yläosa (pinnit jää piiloon)
6. Levitä hiukset varovasti niin, ettei pään sivuille jää koloja, siloita kammalla & suihkuta hiuslakkaa
Etuhiukset:
7. Tupeeraa alta, kampaa sivuun, siloita pinta, suihkuta lakkaa
8. taivuta etuhiusten latvat piiloon etuhiusten alle, kiinnitä pinneillä
9. Lisää koristeet (kukkia, rusetti, pitsinauhaa...)

Every girl needs her own emergency hairdo that can be done in 10 minutes or less.
I usually have my hair on ponytail at home, so that’s where my emergency hairdo starts from.
On average I use 10 to 15 bobby pins for this hairdo. I like this hairdo because it doesn’t get ruined in humid weather or if I’m dancing all night.
1. Make a ponytail
2. Tease the hair on ponytail and use hairspray
3. Fold the whole ponytail up and fasten horizontally with bobby pins.
4. Fold the ponytail back downwards, use comb and hairspray to make it smooth
5. Fold the ends under the bun and fasten with bobby pins
6. If there are any gaps left, use comb and hairspray
- the last part for long bangs -
7. Tease the hair in the front, comb to one side, use hairspray
8. Fold the ends under the hair like above, use 1 or 2 bobby pins to fasten
9. Hairspray, place decorations

Tip: You can just wrap a bandanna to this hairdo the next morning and have Rosie the Riveter look for Sunday brunch.


Tuesday, September 20, 2011

All the way home I'll be warm...

I'm down with a cold. It had to happen, like every September since I don't know when. On my way home from the doctor's I visited a shop, just to buy some basic stuff since I knew I was spending the rest of the week home... but then I was drawn to their yarn section.

And then I got inspired.

And this is what came out of that. 


At first I was aiming for a long scarf, but when I got started I knew it had to become a vintage inspired set with a beret and this typical pull-through scarf. I'm almost ready for the winter now...

Summary in Finnish: Jouduin flunssa-aallon kouriin. Taas. Kuten joka syksy. Kotimatkalla lääkäristä poikkesin kauppaan tarkoituksena ostaa loppuviikoksi mm. ruokaa. Kuinka ollakaan harhauduin kuitenkin lankaosastolle kuumehoureissani ja jouduin Novitan syysuutuuksien viettelemäksi. Silmu lumosi minut ja kuvittelin neulovani siitä pitkän kaulahuivin. Toisin kävi. Aloitettuani ymmärsin että langasta oli tuleva vintage-tyylinen setti baskereineen ja pujotettavine huiveineen...

Wednesday, September 7, 2011

Mad about Mad Men

Mad Men Season 4 Episode Photos - Mad Men Season 4 Episode Photos Photo Gallery

I just finished watching Mad Men season 4, can't wait for the next one! In the meanwhile I can stay in the mood by visiting the Mad Men website and pick ideas for sewing projects from the fashion gallery. Check Fay Miller's outfits- that style would work very well in todays office.
If you're not into sewing or knitting, you can shop Mad Men ispired clothes from Banana Rebublic's Mad Men Collection.

Wednesday, August 31, 2011

100 years of style


What an awesome clip about clothing and dancing styles in the past 100 years in London. Specially liked the part from 30's to 60's!

Wednesday, August 24, 2011

Luau flip flops

My mind is already wandering on the sands of Florida, hence my latest craft project; flip flops for beach parties.
I found these plain black flip flops from Stadium for few euros. The plastic grapes I got as a gift from a dear friend who knew I've been looking for plastic fruits to decorate my shoes or fashinators.
I attached the leaves and grapes with normal sewing thread, this way I can take the decorations away some day. With plastic fruits, these babies are ready for wet parties!


Summary in finnish: Rantakausi on Suomessa jo melkein ohi, mutta en voinut vastustaa kiusausta askarrella söpöt varvastossut tulevaa reissua varten. Tossut löytyivät Stadiumista parilla eurolla ja muoviset viinirypäleet sain lahjaksi ystävältä. Koristeet kiinnitin ompelulangalla, jotta voin poistaa tai vaihtaa ne tarpeen tullen.


Sunday, August 21, 2011

Knitting, anyone?

If you're into knitting and vintage, there are many great online resources for free intructions. One of the best (IMHO) is the Victoria and Albert Museum's 1940's collection.


Scarfs, hats, jumpers and so much more. Even fishnet stockings! And it's not all just for women, there are patterns (mittens, pullovers, hats...) for men too! So, if you're into vintage knitting, this is a must see.

Go ahead, knock yourself out! ;)

Saturday, August 13, 2011

My earrings are so fabulous I got to frame them!


I recently found one of my picture frames with broken glass. Marilyn had to go, but I didn't want to waste a perfectly good frame. It's plain black wooden frame, there's not much to see in the frame itself, so I decided to try how it would work as an earring display.

Once again, I didn't want to wait for the next day and go to the store for some material. Instead I tried to find some useful stuff from my "crafts stash". I ended up using black felt and black rick rack.

How-to: Rick rack works very well here, I just sewed the "uphills" to the felt and let the "downhills" be loose - that's where the earring will hang.
After hand sewing the rickracs on their place I glued the felt on the picture frame background with fabric glue. worked like a charm!

notes: If you got a white frame, try for example white linen with white lace.
If you're wondering what's rick rack - It's a flat braid in wavy form, used in sewing projects for finishing and decorating.

Friday, August 12, 2011

I'm in love...

Sorry folks! I can't help myself. I need to manifest my love for Fluevog shoes.

I think I have four pairs already and I keep craving for more. The shoes are super comfy, there's a bunch of models with a vintage twist and... Well, just see for yourself:


Not just sexy and classy, but also colorful, fun and sassy:


I desperately need cute boots for Fall... ;)

Friday, August 5, 2011

Blue days

You all know how it goes... Sometimes one can go on for weeks circling charity shops and flea markets without actually finding anything worth buying. (Usually happens to me when I'm searching for something specific.)

Today I decided just to make a little round (and not to buy anything) in a Red Cross charity shop Kontti after dropping off some old books and household items that I had no use for anymore. Then I saw these...


And the decision about not buying anything was pretty much gone. Baby blue petticoat and pale blue (unused) set of camisole and bloomers. Oh my (vintage) goodness!

Did I mention that I was actually looking for a straw hat for a millinery project? Didn't get it. I'm just so easily distracted when it comes to pretty things.

I did also found a very cute dress from 70's, but more about that later...

New shoes save the day


I found these cute leather shoes on sale at the local Bianco Footwear and fell in love! Perfect color for the fall season and they are very comfortable yet feminine with a vintage look.
These will go well with both dresses and pants for everyday use. This kind of shoes that have leather on the heels have to be worn carefully; hitting chairs, stairs and doors can damage the leather permanently.


Monday, August 1, 2011

Half-moon manicure with two tones

Summer holiday is over and I got the blues...
Cherry's blog post inspired me to try the half-moon manicure with baby blue and bright white.
I applied the blue color first and let it dry well before adding the white half-moons with a nail color pencil.

Tuesday, July 19, 2011

Half-moon manicure - History and how-to

Half-moon manicure was popular in one form or another from 1920's to 1940's. In 1920's and until late 30's the tip of the nail was also left bare (or colored with lighter color). 

Cosmopolitan Magazine, December 1936. (Picture from here)
In the late 30's it became fashionable to leave only the "half-moon" bare. The trend continued into 1940's and is the look people now normally associate with half-moon manicure. According to some sources the bare sliver on the tip of the nail made also a comback in the 40's. (This page offers a cute summary of makeup styles from 20's to 40's if you're interested...)

I used think that in the olden days the nail polish came only in shades of red and pink was the wildest thing. However the nail polish colors were diverse even back in the days. Colors like silver, gold, green, blue, violet, black and mustard yellow might not have been the most common choice, but they were an option. 

Ladies Home Journal, June 1945. (Picture from here).
Mavala nail polish is my favourite because of the durability and breathability. My favourite shades include:
Smoky Blue
Touch of Provence
Cyclades Blue
Bronze Green
Anchorage
Smoky Blue
Madrid (red)
Paris (red)

The non-reds are my special favourites for a half-moon manicure. Just now I have my eyes on their Blue Curacao, Jazz Club, Music Hall and Acid Yellow.

I love half-moon manicure. It's very durable (Usually my nailpolish starts to peel off from the lower part of the nail that is now left bare and thus: no peeling!) and easy and adds that certain something to your vintage look. This time I used Bronze Green. (If my hand looks strange in the picture it's just because I scanned it... with a copy machine. No cameras around, you see. ;)
 
Fun with copy machine.
Some people like to use guides when they apply the nail polish, but I think they're bit messy if you're in a hurry and don't have time to wait for the polish to dry completely. I've tried using guides, but free-hand method works best for me.

First (after applying and drying the base coat) I decide the height of the half-moon and then go for the first stroke of brush from the highest point towards the tip of the nail. After that I make the second and third stroke with a tilted brush so that a half-moonish shape is left bare. It doesn't need to be perfect right away because I'll add another coat later and perfect the shape.

The method.
If I get nail polish on the half-moon area, or if the shape doesn't appear good enough I scrape the excess off with a toothpick while the polish is still soft (but not that wet). Finally I top everything with Mavala Minute-Quick-Finish that not only adds a top coat, but also dries the polish very fast to a point where it doesn't smudge everything and does not get scuffed that easily.

My nails are quite light in color, so I usually don't color the haf-moons. Sometimes I've used beige or white nail polish though. For a more festive look I've used layer or two of gold or silver nail polish under the main color. This gives the half-moons nice finish. 

Summary in finnish: Puolikuumanikyyri oli suuressa huudossa 1920-luvulta 1940-luvulle ja on nyt vaihteeksi taas melko muodikas... ja antaa toki mehevän lisän vintage-tyyliin. Itse tykkään ko. manikyyristä sen kestävyyden vuoksi. Jostain syystä koko kynnen lakkaukset alkavat yleensä kuoriutua muutaman päivän kuluttua, mutta puolikuumanikyyri pysyy minulla siistinä vähintään viikon. Useimmissa ohjeissa käytetään tarroja ohjaamaan lakan levitystä, mutta itse pidän eniten "vapaan käden taktiikasta". Lakan levitys aloitetaan puolikuun korkeimmasta kohdasta kohti kynnen kärkeä. Ensimmäistä siveltimenvetoa seuraavat kaksi tehdään pitämällä sivellintä vinossa siten että kynnen alaosaan muotoutuu puolikuuta muistuttava kaari. Ensimmäisellä kerroksella ei tarvitse pyrkiä täydellisyyteen, sillä muotoa pystyy muokkaamaan vielä toisella kerroksella. Puolikuun siistimiseen tarvittaessa käytän yleensä hammastikkua kunhan lakka on ehtinyt vähän kuivahtaa. Puolikuumanikyyriin käytän punaista lakkaa vain harvoin. Vaikka punainen saattoi olla yleisin väri, on muitakin, villejä värejä ollut tuotannossa jo vähintäänkin 30-luvulta.

Thursday, July 7, 2011

And all hat jazz!

I love hats. They play well with me. But even if I might have vintage sized (that is small enough to find plenty of vintage shoes) feet, my head is huge... compared to most of the (ladies) vintage hats. So imagine my suprise when I stumbled into a pile of hats in my size on my charity shop round. One even had this really cute hat pin on it!


I'm guessing the first black one could be 40's or 50's, the second 50's or 60's and the brown 70's or 80's. (Not that the age actually matters more than the style.) All are a bit battered, but that's an easy thing to fix. Just hold the hat (or the part you want to fix) over hot steam for a while and gently mold it back to shape. Repeat the procedure if necessary.


People should wear more hats. Really. A hat can make an outfit set off from a crowd and the right hat can make you feel instantly more "dressed" and refined.

Summary in finnish: Hatut ovat ihania! Isoon (58) päähän vain löytää kirppareilta todella harvoin yhtään mitään, ainakaan naisille tarkoitettua. Hiljattain kuitenkin kävi tuuri ja Nokian Fidasta löytyi useampi oikean kokoinen... joista yhtä jopa koristi ihanainen hattuneula! Ikäveikkaukset liikkuvat 40-luvulta 80-luvulle, mutta tärkeintä tietysti ei ole ikä van näkö. Kaikki hatut ovat hiukan kärsineet aikojen saatossa, mutta se on liiankin helppo asia korjata. Pieni hetki vesihöyryssä ja sen jälkeen käsin hellästi muokataan hatut takaisin kuosiinsa. Ihmisten todella pitäisi käyttää enemmän hattuja, myös minun... 

New life for old dancing shoes

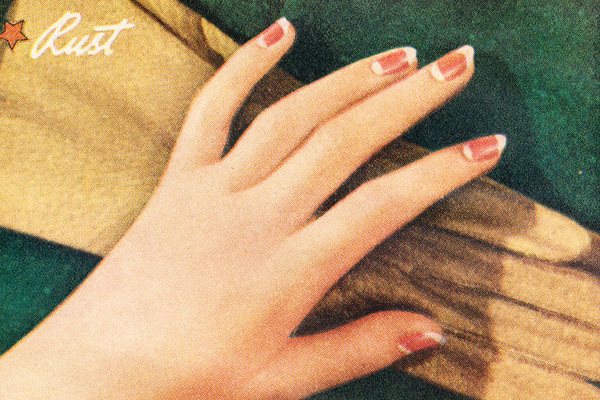
I bought these used dancing shoes about a year ago and did not quite like the plain white color.
 
At first I thought I could paint them with silk colors or draw some pattern in them but I was worried the outcome would not be neat. Then I came up with an idea of attaching some ribbons or fabric on them. I found this light weight brown lace from the local craft shop and decided to try to glue it on.


Here are some tips if you like to do the same for your shoes:

I removed the t-strap to make the shoes look more like tango shoes (1.)

Cut a piece from the lace, and try it on the shoe in different angles (2.)

Pin the lace on the shoe and cut off excess (3.)

Glue the trimmed end first (it would have been easier to use lace ribbon instead of this one I used, since this was too wide for the shoe and it had to be cut), be careful with the glue, it gets everywhere.
Trim the sides so that there’s only about 2 mm extra lace, use pins to tuck the ends between sole and the shoe, use the glue generously here (4.)

Be careful not to leave any bumps on the inside of the shoe if you fold the lace and glue it there (that’s how I did it)

Here's the outcome:


Some thoughts: I think the shoe would look nice if there’d be some color on the heel part too. I’m still looking for rhinestones or such to complete the new look.

 
I’ve danced argentine tango wearing these and even got stepped on a few times and the lace stayed put. Bad for my toes, but good to know the glue holds well.

Summary in finnish: Käytin Gutermannin kangasliimaa tuunatakseni vanhat lattarikengät tangokuntoon. Ennen liimaamista kangasta kannattaa sovitella eri kulmissa kengän päälle. Helpointa on käyttää kapeampaa pitsinauhaa, jolloin ei joudu taittamaan pitsiä kengän sisäpuolelle. Kengän reunoissa käytin runsaammin liimaa ja painelin neulaa apuna käyttäen pitsin pohjan ja kengän pääliosan väliin. Pitsi ja liima löytyivät Tampereen Kauppahallin nappikaupasta.