Showing posts with label DIY. Show all posts

Wednesday, May 22, 2013

IKEA hack - new life to Frosta stools


I got four of these IKEA Frosta stools stacked in my kitchen. I bought them about 10 years ago and they've starting to lose their lacquer finish. 
I was about to replace them with new ones, but then i got stingy and decided to give them a coat of paint. I even got the paint for free as Cherry's renovating her apartment and had some leftover furniture paint from her kitchen makeover. Luckily we have similar taste, so the color she had chosen was perfect for me too.

I used sandpaper to get rid of old lacquer and then wiped the stools clean with a damp cloth. 2 coats of paint  and voila! There's probably more "professional" way of doing this, but if I get few extra years for my stools like this, I'm content.


To avoid washing the paint tray later, I covered it with plastic bag. I used a small brush for the edges of the stool and a small roller for the top part.


I didn't want to paint the legs, so I used some tape to protect them.

Alvar Aalto designed very similar stool already 1930's ( stool number 60 ), it's now available in different colors, also in turquoise, sweet!


Thursday, October 11, 2012

I need to knit something cute asap!

The weather's getting a bit chilly here in Finland. Not cold enough for proper winter hat, but just perfect for wearing a soft woolly head band. I came up with an idea to knit a head band in tube so it can be twisted and still look the same on both sides. I made it wide enough so I can hide occasional bad hair day with it.


I used some left over yarn (it matches my rubber boots!) from my stash. I've made head bands before, but this one was the first one I knitted in round. Super easy one night (or two) project while watching TV. I used 5 double pointed needles, 40 stitches, plain knit all the way. When it was long enough to go around my head, I ended it with "slip one - knit one & pass slipped stitch over". Then just twisted once and hand stitched the ends neatly together. I used less than one ball of yarn, so I still got some left for possible decorations, perhaps a crochet flower?


I think the pale pink head band would look cool on someone with darker hair. Maybe I'll make one in black too!

Monday, August 6, 2012

Bringing Zen to my living room

I live in a late 1950's building and tend to choose 50's items and  style also in my home decoration. I like the simplicity of mid-century design but I'm not too strict with decades or styles, as long as everything looks and feels good.
Most of the furniture in my home is either inherited or bought used. Living so close to IKEA I haven't been able to avoid having something new as well. I try to keep the amount of stuff to a minimum, it's easier to clean and I think vintage furniture looks better with some space around them. I've recently developed a growing interest on minimalism and started a never ending project of decluttering the apartment.

My latest interior design project (apart from throwing stuff away) is a little zen garden/beach to the living room coffee table. I love to doodle and the fine sand makes a nice surface to draw with a stick. A zen garden is a fun alternative for coffee table books or flowers. I didn't place any plants in my mini beach since I want to be able to put the dish away to a cupboard from time to time.


I've brought the sea shells as souvenirs from my trips to Australia, Africa and India. I like to have them somewhere so I can look at them during the long cold winters and think about the warm sand on the beach.
The decoration sand I bought from a candle shop, the dish was made by my mother. The chair shown in second picture is Danish design from 1957 and the table is from local flea market, can't really tell the decade, I'm guessing it's from early 60's.


Wednesday, July 4, 2012

Ice cream sticks and banana splits

I've been eating a lot of ice cream this summer and the sticks started piling up. So I got crafty and made these simple chalk board inspired labels for my herb garden on the balcony.

I used ordinary craft paint and white marker. Any mistakes on white marker can be fixed with a black narrow marker.

Suomeksi: Jäätelötikuista voi tehdä liitutaulu-henkisiä minikylttejä yrttiruukkuihin. Tavallista askartelumaalia kerros, pari ja teksti vedenkestävällä valkoisella tussilla. Jos tekstistä tulee sotkuinen, sitä voi korjailla päälle mustalla kapealla tussilla.


Tuesday, May 29, 2012

Funky "enamel" keys

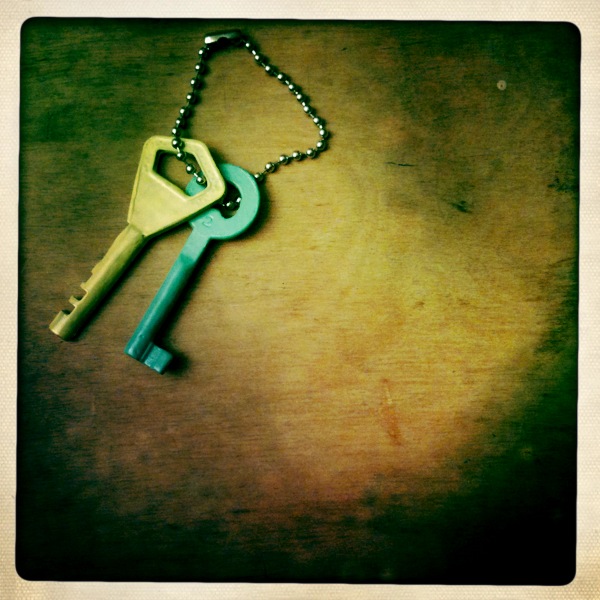
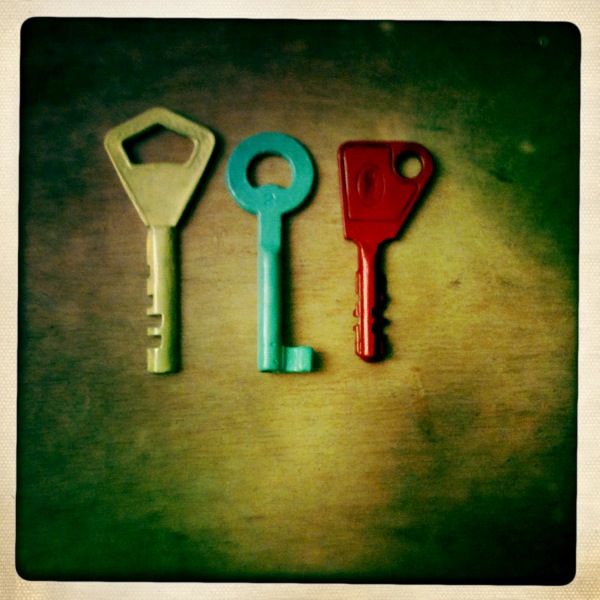
I love enamel on jewelry, so I couldn't wait to try this trick I spotted in Pinterest couple of days ago. I had only one vintage key available so I tried how modern keys would look with nail polish coat on them. While looking for old keys I also found one fake silver medallion so I had to paint that too...


Suomeksi: Vanhat avaimet voi muuttaa jännittävän näköisiksi koristeiksi maalaamalla ne kynsilakalla. Homma on aikaavievää ja vaatii vakaata kättä & kärsivällisyyttä, mutta lopputulos on aika hurmaava, vai mitä? Jos pieni bling-bling sopii makuusi, kannattaa kokeilla myös kynsistrasseja avaimia sulostuttamaan.

I believe the original idea is from this blog / Alkuperäinen idea avainten "emalointiin" tässä blogissa

Sunday, May 27, 2012

Canvas sneaker revamp


The sun is shining and I feel like dancing! 
I love to wear heels but a girl's gotta have some flats too, especially in summertime when dancing outside on rough wooden floors. Simple sneakers are great for dancing, but they can look too sporty to wear with a skirt or a dress, so I turned my plain sneakers into a canvas for artistic experiments.


I used craft paints suitable for wood, paper etc. and a white fabric marker for sharpening the outlines of my drawings. I googled "old skool tattoos" and "tattoo shoes" for artwork ideas. I pretty much just copied what I liked and thought I can draw on such small space with equipment I already had.


Here are the ready ones, they look the same but not so much that it'll look factory made. I'd love to try this on pumps too, but I need more practice and finer brushes.

Put on your dancing shoes!


Tuesday, May 8, 2012

Femme Fatale lace earrings DIY

I saw some cool lace earrings on Etsy that cost 20 $. They'd be the perfect  accessory to wear in a Milonga (Argentine tango event) with a nice dress. But before adding those earrings to cart I decided to give it a go and try making a pair myself. They turned out fine!


I think they'd look better if the lace had more volatile pattern in it, but it's fine like this for me.

How-to: Cut two identical pieces following the pattern in the lace. The lace needs to be starched with something that doesn't have color when dried (sugar water or glue water). First I tried sugar and water and then tried glue water for another pair. Glue (water based craft glue) worked better I think. I didn't measure the glue, just put some on a plate and added little bit of water to form a liquid. I soaked the lace pieces there for a while (10 minutes or so) and then placed them over a plastic film to dry. The lace is now firm, but not scratchy hard.
The part where you place the hook needs to be reinforced so that the lace doesn't start to fray. Hand stitching works fine here.


Saturday, April 28, 2012

T-shirt revamp


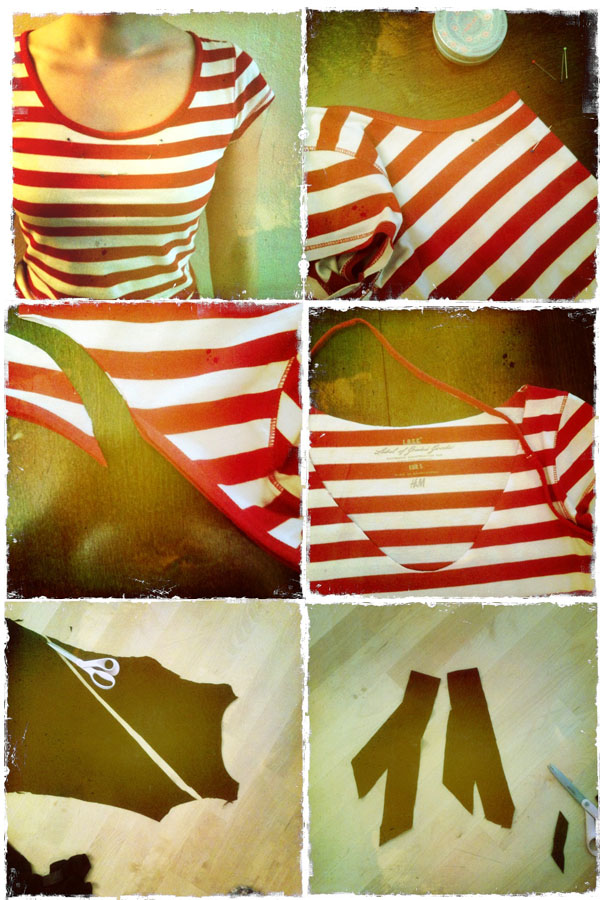
I was going through my closet and found two t-shirts I no longer like to wear. The other one is plain black and the other has red and white stripes. I like stripy t-shirts in the summer, but this one looks boring. So I decided to see if I can make something cool and wearable out of them! In case you want to make one too, here are the details:
Pin the new neckline in desired shape. fold & cut excess fabric off.
Bias cut the other t-shirt into two strips (the t-shirt I used was too tiny for one long ribbon).

 Sew two pieces together to form a long ribbon. Pin in reverse, sew along the edge. Turn t-shirt's right side up, fold the ribbon and pin in place. Use elastic stitch to sew in place along the edge of folded ribbon. Leave an opening if you want to add elastic cord in the neckline for better fit.


For the bow: Cut approx. 18 cm x 18 cm (7 inch) square, fold in two, sew around (leave a hole in middle for turning). After turning hand stitch the hole. cut another piece approx 6 x 8 cm for attaching the bow, fold, sew and turn right side up. Hand stich the bow in place.
Voilà!


Notes: I only used one side of the black t-shirt for this project, so I could easily make another one like this with the left over fabric, just need to find another t-shirt that needs revamping! 


Sunday, December 11, 2011

Moni paketti päältä kaunis - Crafty ideas for wrapping Christmas presents

I sometimes use knitting yarn left overs to decorate presents. I used simple chain stitch to this one.


I've printed my favorite Christmas carols to decorate plain packing paper wrapped presents. I think brown paper looks cool with red silk ribbon.

I drew the reindeer and reindeer steps in the snow directly to the paper after wrapping. You can see the details by clicking the photo bigger.

Poro ja jalanjäljet on piirretty pakettipaperiin tussilla. Alemmassa paketissa paperinarua, päälimmäisessä silkkinauhaa. Päälimmäisen paketin nauhan alla on joululaulun sanat.
Lahjanarun sijaan voi käyttää villalangasta virkattua ketjusilmukkanauhaa.

Thursday, December 8, 2011

Party pumps

Take your ordinary black pumps to the next level by adding some decorations to them.


I used leather ribbon and black satin rose to give my black pumps a rock'n'roll twist. First I glued the ribbon into a bow and then glued the rose on top. When they were dry I glued them in place with a glue gun. If you don't want the decorations to be permanent you can use a clip on earring base for the bow.

Suomeksi: Tavalliset mustat korkokengät muuntuvat pikkujouluhenkisiksi ja vähän rokahtaviksi värillisestä nahkanauhasta taitetulla rusetilla. Rusetin päällä koristeena musta silkkiruusu. Kiinnitin koko systeemin kenkään kuumaliimalla.

Wednesday, August 24, 2011

Luau flip flops

My mind is already wandering on the sands of Florida, hence my latest craft project; flip flops for beach parties.
I found these plain black flip flops from Stadium for few euros. The plastic grapes I got as a gift from a dear friend who knew I've been looking for plastic fruits to decorate my shoes or fashinators.
I attached the leaves and grapes with normal sewing thread, this way I can take the decorations away some day. With plastic fruits, these babies are ready for wet parties!


Summary in finnish: Rantakausi on Suomessa jo melkein ohi, mutta en voinut vastustaa kiusausta askarrella söpöt varvastossut tulevaa reissua varten. Tossut löytyivät Stadiumista parilla eurolla ja muoviset viinirypäleet sain lahjaksi ystävältä. Koristeet kiinnitin ompelulangalla, jotta voin poistaa tai vaihtaa ne tarpeen tullen.


Saturday, August 13, 2011

My earrings are so fabulous I got to frame them!


I recently found one of my picture frames with broken glass. Marilyn had to go, but I didn't want to waste a perfectly good frame. It's plain black wooden frame, there's not much to see in the frame itself, so I decided to try how it would work as an earring display.

Once again, I didn't want to wait for the next day and go to the store for some material. Instead I tried to find some useful stuff from my "crafts stash". I ended up using black felt and black rick rack.

How-to: Rick rack works very well here, I just sewed the "uphills" to the felt and let the "downhills" be loose - that's where the earring will hang.
After hand sewing the rickracs on their place I glued the felt on the picture frame background with fabric glue. worked like a charm!

notes: If you got a white frame, try for example white linen with white lace.
If you're wondering what's rick rack - It's a flat braid in wavy form, used in sewing projects for finishing and decorating.

Thursday, July 7, 2011

New life for old dancing shoes

I bought these used dancing shoes about a year ago and did not quite like the plain white color.
 
At first I thought I could paint them with silk colors or draw some pattern in them but I was worried the outcome would not be neat. Then I came up with an idea of attaching some ribbons or fabric on them. I found this light weight brown lace from the local craft shop and decided to try to glue it on.


Here are some tips if you like to do the same for your shoes:

I removed the t-strap to make the shoes look more like tango shoes (1.)

Cut a piece from the lace, and try it on the shoe in different angles (2.)

Pin the lace on the shoe and cut off excess (3.)

Glue the trimmed end first (it would have been easier to use lace ribbon instead of this one I used, since this was too wide for the shoe and it had to be cut), be careful with the glue, it gets everywhere.
Trim the sides so that there’s only about 2 mm extra lace, use pins to tuck the ends between sole and the shoe, use the glue generously here (4.)

Be careful not to leave any bumps on the inside of the shoe if you fold the lace and glue it there (that’s how I did it)

Here's the outcome:


Some thoughts: I think the shoe would look nice if there’d be some color on the heel part too. I’m still looking for rhinestones or such to complete the new look.

 
I’ve danced argentine tango wearing these and even got stepped on a few times and the lace stayed put. Bad for my toes, but good to know the glue holds well.

Summary in finnish: Käytin Gutermannin kangasliimaa tuunatakseni vanhat lattarikengät tangokuntoon. Ennen liimaamista kangasta kannattaa sovitella eri kulmissa kengän päälle. Helpointa on käyttää kapeampaa pitsinauhaa, jolloin ei joudu taittamaan pitsiä kengän sisäpuolelle. Kengän reunoissa käytin runsaammin liimaa ja painelin neulaa apuna käyttäen pitsin pohjan ja kengän pääliosan väliin. Pitsi ja liima löytyivät Tampereen Kauppahallin nappikaupasta.